
How to Plan a Hiking Elopement in 2026
Originally written October 2023, updated February 2026

Planning a Hiking Elopement
Hiking elopements aren’t a trend anymore.
They’re a very intentional choice.
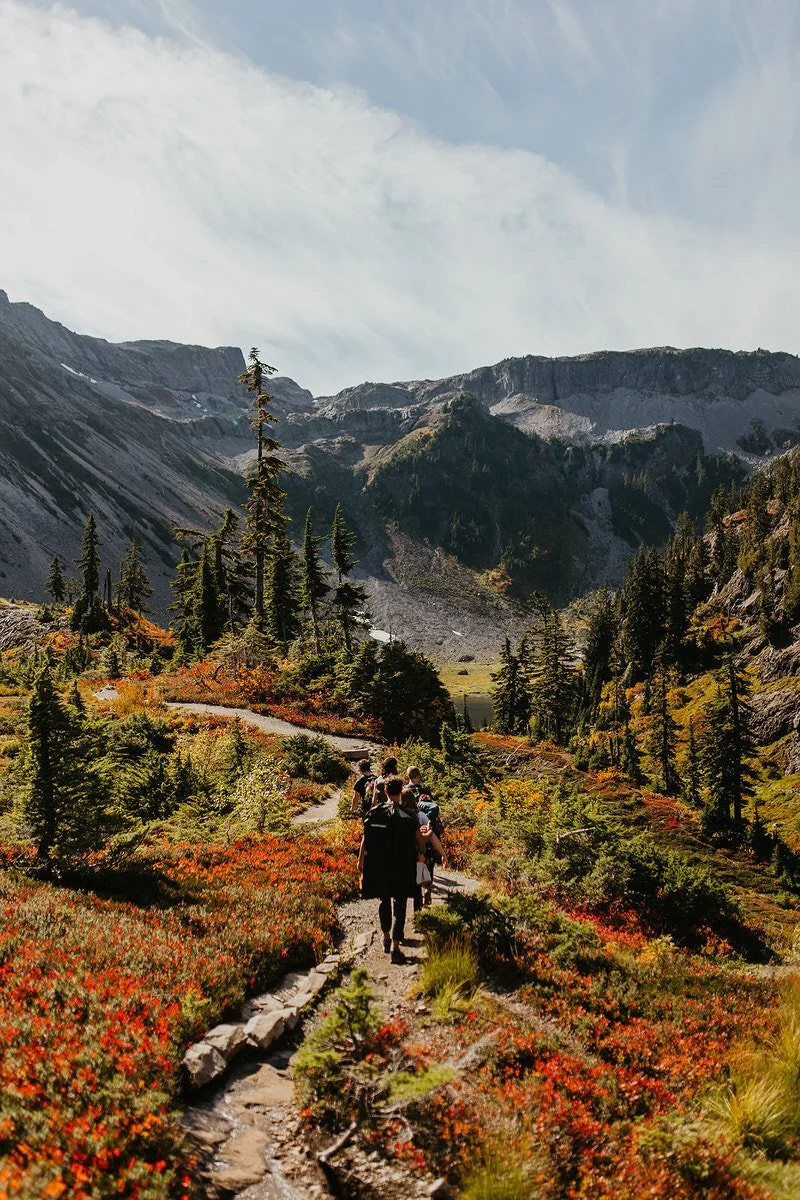
More couples are stepping away from ballrooms and guest lists and choosing trails, ridgelines, alpine lakes, quiet forests, coastal cliffs. They want their wedding day to feel like something they actually do together, not something performed in front of 120 people.
But here’s the thing most people don’t realize:
A hiking elopement is simple.
It is not casual.
It still requires permits. Timelines. Logistics. Backup plans. Weather awareness. Guest communication. Leave No Trace responsibility.
The couples who love their hiking elopement the most are not the ones who wing it.
They’re the ones who plan it well.
I’ve helped couples plan hiking elopements across Washington’s National Parks and National Forests, and here’s what actually makes them work!
Who this guide is for:
A hiking elopement might be a good fit for you if:
You feel most like yourselves outside
You would rather move your body than sit through a formal reception
You want privacy without feeling isolated
You’re okay with dirt on your boots
You care about protecting the land you’re getting married on
It might not be the right fit if:
You want 40 guests
You need predictable weather
You don’t enjoy being physically uncomfortable even a little
You want a tightly scheduled, production-style wedding day
No option is better.
They’re just different!
If the hiking version feels like a deep exhale when you picture it, keep reading.
Quick Planning Snapshot: How to Plan a Hiking Elopement
If you’re skimming, here’s the 9-step roadmap for planning a hiking elopement in 2026:
Decide how far you realistically want to hike and what level of difficulty feels good
Choose scenery that fits your vision and the season you’re eloping in
Research trail access, permits, and marriage license requirements early
Build a timeline around hiking pace, elevation gain, and daylight
Pack intentionally, including weather layers, water, and ceremony essentials
Communicate clearly with any guests about expectations and physical demands
Decide if bringing along your dog is the right move and how to include them effectively
Follow Leave No Trace principles to protect the landscape
Plan for backup weather options and seasonal trail conditions
Below, I’ll walk you through each step in detail so you can plan a hiking elopement that feels calm, intentional, and actually fun 👇
If you’re short on time, jump to what you need!:
Table of Contents
What Is a Hiking Elopement?
If you’ve ever looked at a mountain trail and thought,
“Wait… what if we just got married up there? 🤩”
That’s a hiking elopement.
You hike.
You elope.
You experience your wedding day in a place that feels alive.
But let’s clarify something right away:
A hiking elopement does not mean you have to summit Mount Rainier at 4am in crampons! It doesn’t mean 12 miles straight uphill. It doesn’t mean suffering.
It means your ceremony location requires intentional walking: anything from a 20-minute walk to a half-day hike. Maybe that’s half a mile through a forest. Maybe it’s five miles to a ridgeline. Maybe it’s a sunrise trail with headlamps and coffee in hand.
A hiking elopement is less about mileage and more about mindset.
It’s choosing privacy over performance.
Experience over production.
Presence over pressure.
And yes, it requires planning. Real planning.
Because the difference between a chaotic trail day and a grounded, meaningful adventure is not luck. It’s preparation.
This guide is your full 2026 roadmap.
Trails. Permits. Packing. Guests. Dogs. Timelines. Weather. Leave No Trace. The stuff people forget. The stuff that makes or breaks the day.
If you want your wedding to feel like a deep breath instead of a production schedule, you’re in the right place.
Let’s plan this thing!
Step 1: Decide What Kind of Hiking Experience You Actually Want
Before you open AllTrails.
Before you start pinning locations.
Before you fall in love with a mountain photo on Pinterest.
You need to decide what kind of experience you want your wedding day to feel like.
Because “hiking elopement” can mean wildly different things!
For some couples, it’s a mellow one-mile forest trail with grandparents in attendance.
For others, it’s a 7-mile alpine ridge with 2,000 feet of elevation gain and no one else around.
Both are hiking elopements.
The difference is intention.
Let’s break this down 👇
Distance and Elevation: Be Honest With Yourselves
This is not the time for aspirational fitness goals.
If your longest hike together has been 3 miles, planning an 8-mile round trip with 3,000 feet of gain on your wedding day is probably not the move.
A good rule to follow:
Choose something you can comfortably complete while carrying extra gear, wearing slightly different clothing, and managing wedding-day emotions.
That usually means:
1–3 miles = relaxed, guest-friendly, easier pacing
3–5 miles = moderate adventure
5+ miles = full hiking experience, usually best without guests
Elevation gain matters more than mileage.
A 2-mile hike with 1,500 feet of gain will feel harder than a 4-mile gradual trail.
There is no medal for choosing the hardest option.
There is something magical about choosing a hike that lets you feel steady, grounded, and present.
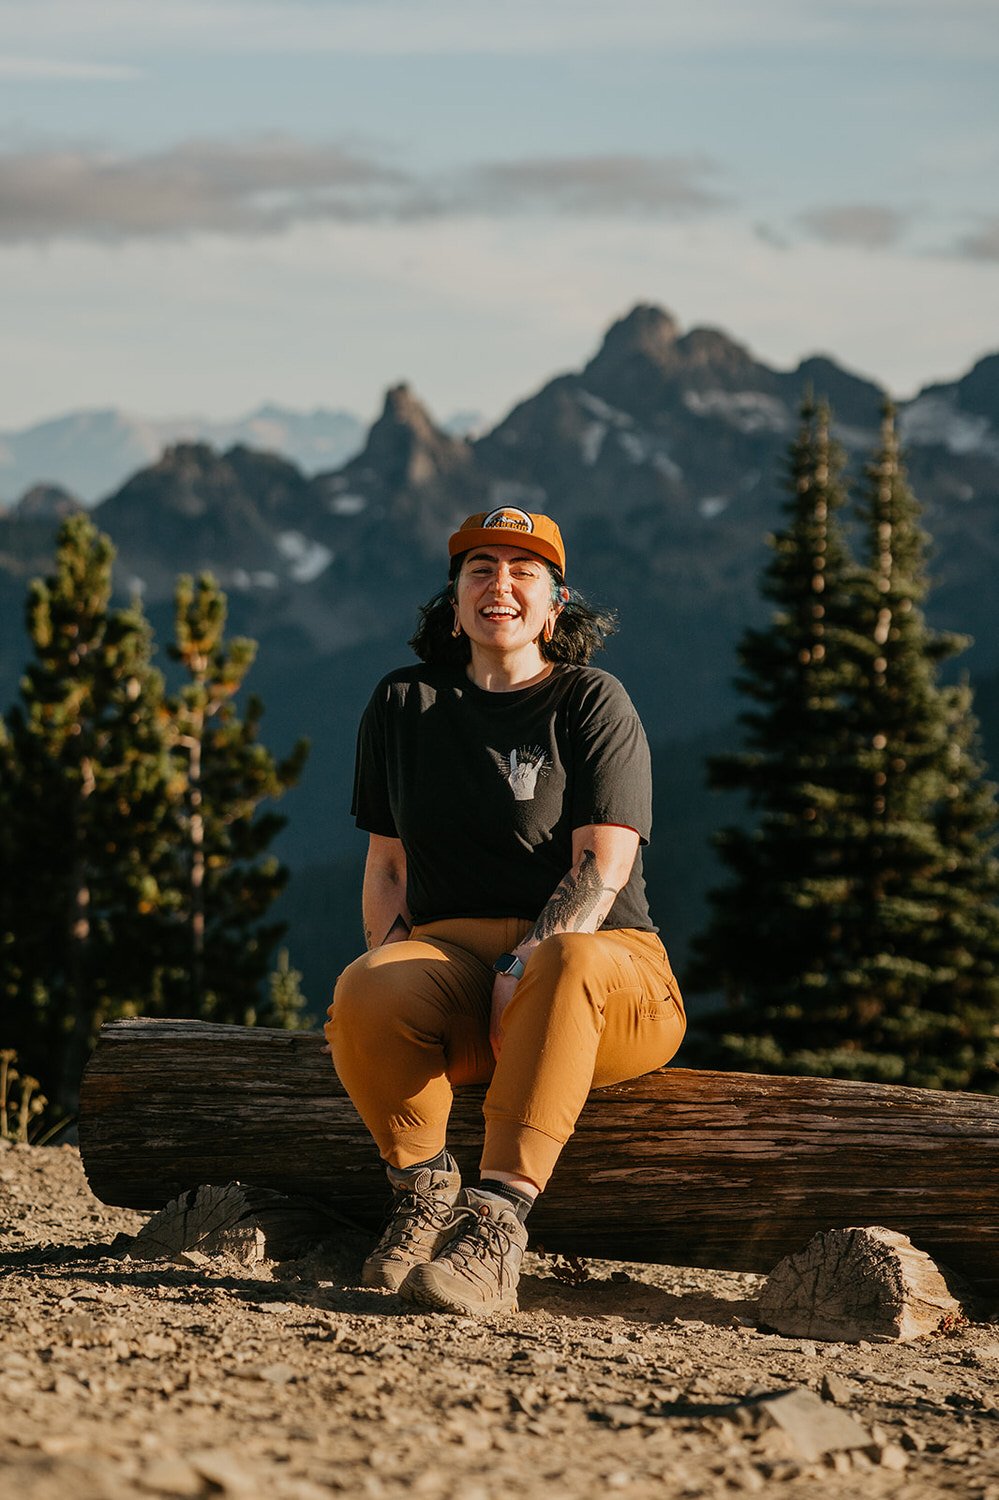
What Kind of Scenery Feels Like You?
Mountains?
Alpine lakes?
Wildflower meadows?
Moody forests?
Coastal cliffs?
Different landscapes require different timing, different seasons, and different physical effort.
Alpine views often mean higher elevation and snow lingering into July.
Waterfall trails can be short but busy.
Coastal hikes might involve sand, wind, and unpredictable weather.
Wildflower meadows require careful Leave No Trace planning to avoid trampling.
Start by asking:
When you picture your ceremony backdrop, what’s behind you?
That answer narrows everything.
Sunrise or Sunset?
This isn’t just about light.
It’s about logistics.
Sunrise hikes:
More privacy
Cooler temperatures
Fewer tourists
Earlier wake-up time
Sunset hikes:
Warmer, slower morning
Potentially busier trails
More flexibility with guests
If privacy is your highest priority, sunrise is often your best friend.
If warmth and comfort matter more, sunset might be the better fit.
Private and Remote vs Accessible and Shared
Be honest about how you feel seeing other hikers.
Some couples don’t mind a few “congrats!” from strangers.
Others want complete solitude.
True privacy usually requires:
Longer hikes
Weekday dates
Shoulder season timing
Early starts
There’s no wrong choice.
But clarity here will prevent disappointment later.
A Quick Gut Check
Picture this:
You’re halfway up the trail.
Your pack is on.
Your partner is next to you.
Your heart rate is up a little.
You’re laughing.
Does that feel exciting?
Grounded?
Aligned?
Or does it feel stressful? Are you worried about a little bit of sweat or dirt on your shoes?
Your wedding day should feel like you. Not like a test.
Once you know the type of hiking experience you want, choosing the right trail becomes a strategy instead of a guessing game.
Step 2: Choose the Right Trail (Without Guessing)
Once you know the type of hiking experience you want, it’s time to narrow it down to an actual trail.
This is where a lot of couples get overwhelmed.
There are thousands of hikes. Every blog says “best.” Pinterest makes everything look easy. And it’s very possible to choose a trail that looks incredible online but feels completely wrong in real life.
So let’s make this simple and strategic.
Use Online Hiking Sites Strategically
Online hiking platforms are one of the best planning tools you have. They just need to be used intentionally.
Start by filtering trails based on the experience you decided on in Step 1. Mileage and elevation gain should match your actual comfort level, not your aspirational fitness goal.
From there, slow down and read recent trip reports carefully.
Look for notes about:
Snow lingering at higher elevations
Washed-out roads or forest service closures
Water crossings
Loose scree (small rocks that are easy to slip on) or exposed ridgelines
Bug conditions
Crowd levels at different times of day
Photos are helpful, but focus on terrain and access points, not just the dramatic summit shot.
If you’re planning a Washington hiking elopement specifically, it’s worth using both AllTrails and Washington Trails Association.
AllTrails is excellent for filtering by distance, elevation gain, and overall difficulty. It gives you a quick overview and a wide range of options.
Washington Trails Association, on the other hand, tends to offer more detailed, hyper-local trip reports. The elevation stats are often more realistic, the seasonal updates are frequent, and hikers will mention road access conditions, snow levels, and trail damage in much more detail. For Washington elopements especially, that kind of information can make or break your timeline.
Using both platforms together gives you range and accuracy.
Neither replaces real-world scouting. But they help you narrow options strategically instead of guessing!
Pro Tip: Lean Into Your Local Elopement Photographer
This is honestly the best advice I can give you.
A local elopement photographer is not just someone who shows up with a camera.
They’ve likely:
Hiked the trail themselves
Shot an elopement there before
Tracked seasonal changes year after year
Noticed where the crowds actually bottleneck
Learned where light hits at sunrise versus sunset
Figured out which “epic” viewpoints are actually stressful on a wedding day
Online trail stats don’t tell you how a place feels.
A local photographer can tell you:
“Technically it’s 3 miles, but the last half mile is loose scree and not ideal in a dress.”
Or:
“This lake is stunning, but by 10am it turns into a parade.”
Or:
“There’s a quieter overlook 15 minutes earlier that gives you 90 percent of the view without the chaos.”
That kind of insight only comes from being there.
If you’re planning a hiking elopement, choosing someone who regularly scouts and works in that region will save you hours of research and prevent a lot of avoidable stress.
The right trail isn’t just about mileage and elevation.
It’s about how it supports your day.
Step 3: Understand Permits and Legal Requirements
This is the least exciting part of planning a hiking elopement.
It’s also the part that can cause the most stress if ignored.
Different trails fall under different land management agencies. And each one has its own rules around ceremonies, group sizes, photography permits, and special use permits.
Before you send invites or lock in a location, figure out who manages the land (your photographer definitely can help with this, too!).
National Parks
If your hiking elopement is in a National Park, you will almost always need a Special Use Permit for your ceremony.
This applies even if:
It’s just the two of you
You’re not setting up décor
The ceremony is short
National Parks have specific rules about:
Group size
Ceremony locations
Restrictions on arches or décor
Drone bans
Photography permits
Processing times can range from a few weeks to several months depending on the park and season.
Do not assume you can “just show up.”
National Forests
National Forest land tends to be more flexible than National Parks, but that doesn’t mean there are no rules.
Many National Forest districts require permits for organized ceremonies, especially if:
You’re bringing guests
You’re reserving a site
You’re setting up chairs or décor
Some smaller, low-impact ceremonies may not require a permit, but it depends on the district. Always check with the specific ranger station that manages your trail.
Rules vary widely.
State Parks
State Parks typically require a special event permit for ceremonies.
They may also have:
Designated ceremony areas
Guest count limits
Time restrictions
Parking limitations
State Parks can be beautiful and more accessible, but they often have more structured rules.

Private Land
If you’re eloping on private land, cabin property, or Airbnb-style locations, always confirm:
That events are allowed (!!!)
That your guest count is permitted
That parking is sufficient
Some short-term rentals strictly prohibit events, even small ones.
Marriage License Basics
Permits allow you to hold a ceremony in a location.
They do not make your marriage legal.
Marriage license requirements vary by state. If you’re eloping in Washington, you must:
Apply in person or online depending on the county
Observe the mandatory three-day waiting period
Get married within 60 days of issuance
Have two witnesses present for the ceremony
If you’re traveling from out of state, double-check requirements early so timing doesn’t catch you off guard.
Read more about how to legally elope in Washington to make your life easy as hell.
Build Permit Timelines Into Your Planning
Do not wait until the month before your elopement to look into permits.
Some parks process quickly. Others take months. Some have seasonal caps.
Your location should not be considered “locked in” until the permit is approved.
When this step is handled early, everything else becomes easier.
Common Permit Mistakes Couples Make
Permits aren’t complicated. They’re just easy to overlook.
Here are the most common issues:
Assuming a small hiking elopement doesn’t require a permit. Many public lands still require one, even for just the two of you.
Waiting too long to apply. Some locations need weeks or months of lead time, especially in peak season.
Confusing photography permits with ceremony permits. They’re often separate, and one doesn’t replace the other.
Treating a location as “locked in” before the permit is approved.
When permits are handled early, everything else becomes simpler. You can build your timeline, communicate with guests, and move forward without uncertainty hanging over your plans.
Step 4: Build a Timeline Around the Hike
A hiking elopement is not a traditional wedding day with a hike added in.
The hike is the structure of the day.
When couples try to follow a standard wedding timeline, everything starts to feel rushed. The lighting feels off. The energy feels off. The pacing feels off.
Instead, your timeline should revolve around:
Trail conditions
Elevation gain
Daylight
Temperature
Your natural pace
Everything else fits around that.
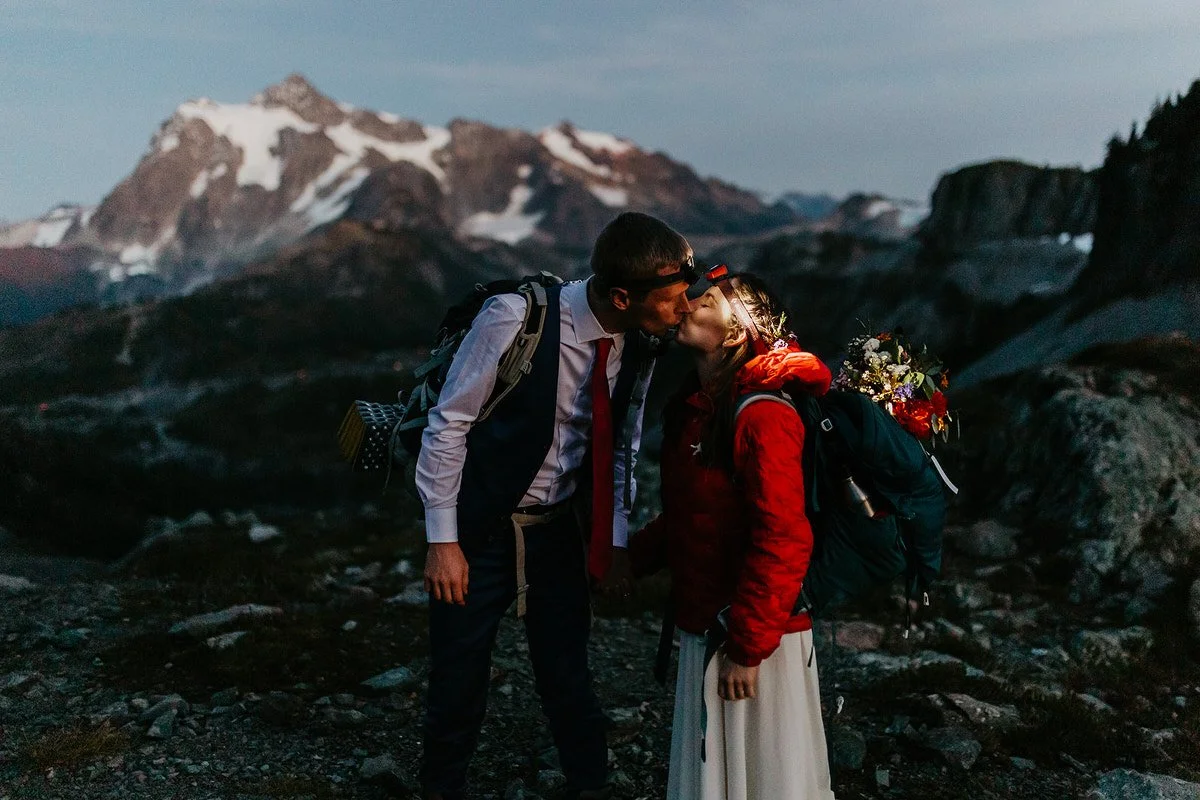
Start With Light, Not Ceremony Time
If you’re planning for sunrise or sunset, that lighting window becomes your anchor point.
Work backward from there.
For a sunrise hiking elopement:
Determine actual sunrise time
Plan to arrive at your ceremony location 20 to 30 minutes before
Factor in hiking pace, elevation, and breaks
Add extra buffer time for unexpected delays
For sunset:
Aim to reach your ceremony location 45 to 60 minutes before sunset
Leave room for golden hour portraits afterward
Factor in hiking down in lower light
Sunlight dictates everything.
Hiking Takes Longer on a Wedding Day
You will not move at your usual pace.
You’ll likely be carrying more gear.
You may be adjusting outfits.
You’ll stop for water, nerves, photos, and moments.
Add more buffer time than you think you need.
If a trail normally takes 90 minutes, consider budgeting closer to 2 hours on your elopement day.
Rushing is the fastest way to drain the magic.
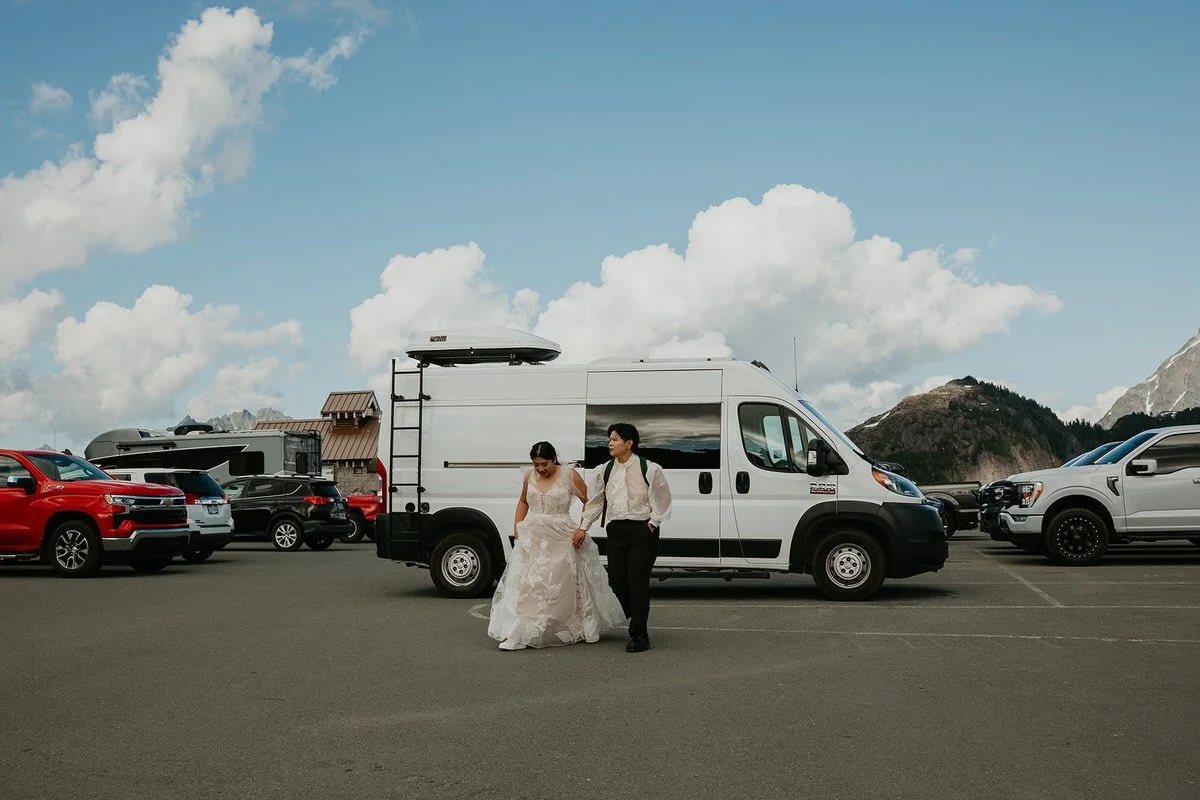
Plan for Getting Ready Logistics
Where are you getting ready?
A cabin near the trailhead
At home before driving out
At the trailhead parking area
Hiking in casual clothes and changing at the top
Each option affects timing.
Changing at the summit can work beautifully, but it adds 15 to 30 minutes of setup time. Getting ready off-site may require extra driving.
Build it in early so you’re not improvising in a windy parking lot.
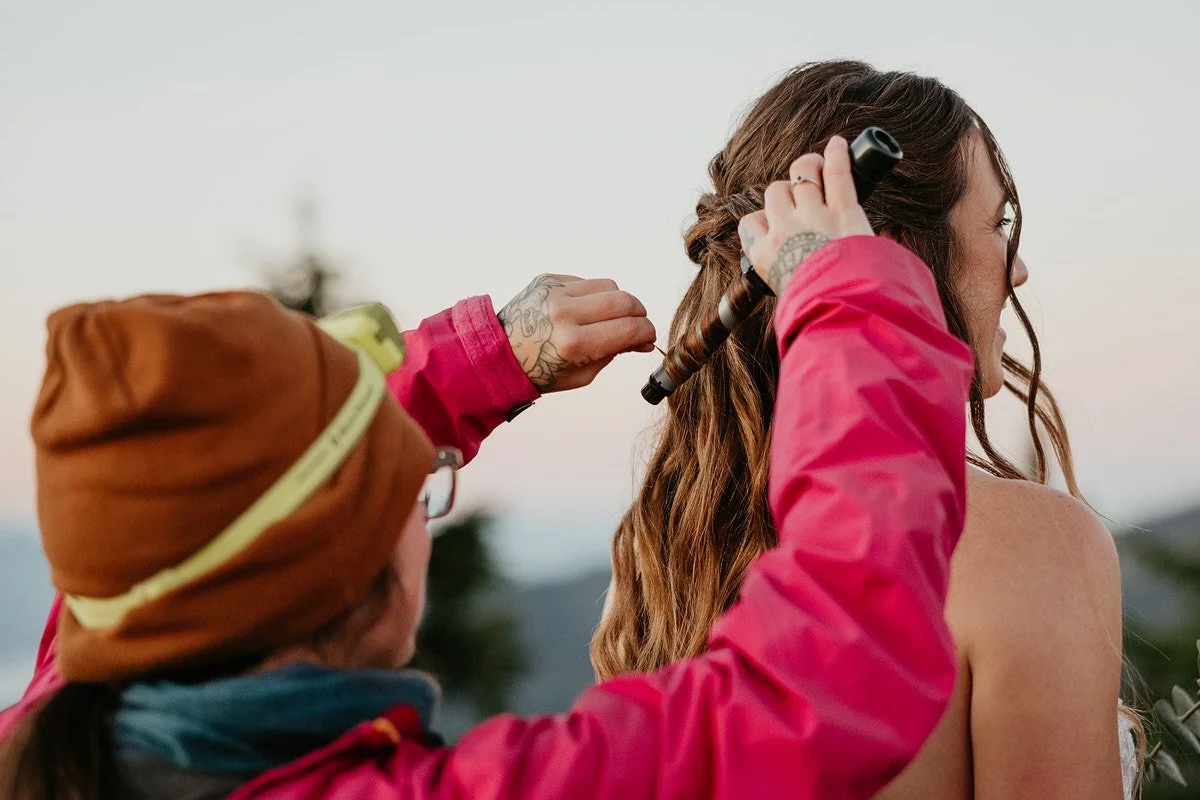
Consider a Hair & Makeup Artist Who Will Hike With You
If you want to look polished without sacrificing the adventure, hire a hair and makeup artist who’s willing to hike to your ceremony location.
Not every artist is trail-ready. But the right one will:
Do touch-ups after the hike
Handle wind, sweat, and sun like a pro
Keep you feeling confident without overdoing it
One of my favorite Washington elopement artists is Pacific Brides. They specialize in outdoor weddings and know how to create looks that actually hold up in real mountain conditions.
Having someone there for final touches at the summit? Game changer.
Account for Weather and Conditions
Mountain weather changes fast.
If you’re hiking in summer, start earlier to avoid heat.
If you’re hiking in fall, sunset comes quickly.
If you’re hiking in shoulder season, snow and mud can slow you down.
Your timeline should include:
A weather buffer
A turnaround time
A backup plan
A good timeline feels steady, not packed.
Sample Timeline: 4-Mile Sunset Hiking Elopement
Here’s a simple example for context:
2:30 PM - Hair and makeup at your Airbnb
4:00 PM - Drive to trailhead
*Add 20 minutes at the trailhead for bathroom, boots, packing, nerves!
4:30 PM - Begin hike with photographer
6:00 PM - Arrive at ceremony location, change into wedding outfits
6:30 PM - Private vows
7:00 PM - Golden hour portraits
7:45 PM - Begin hike down
9:00 PM - Back at trailhead
Notice what’s not included:
No rushed ceremony at noon.
No squeezing in a reception between hikes.
No rigid, minute-by-minute structure.
Just a day built around movement and light.
When your hiking elopement timeline respects the trail, everything feels calmer. You’re not racing the mountain. You’re moving with it.

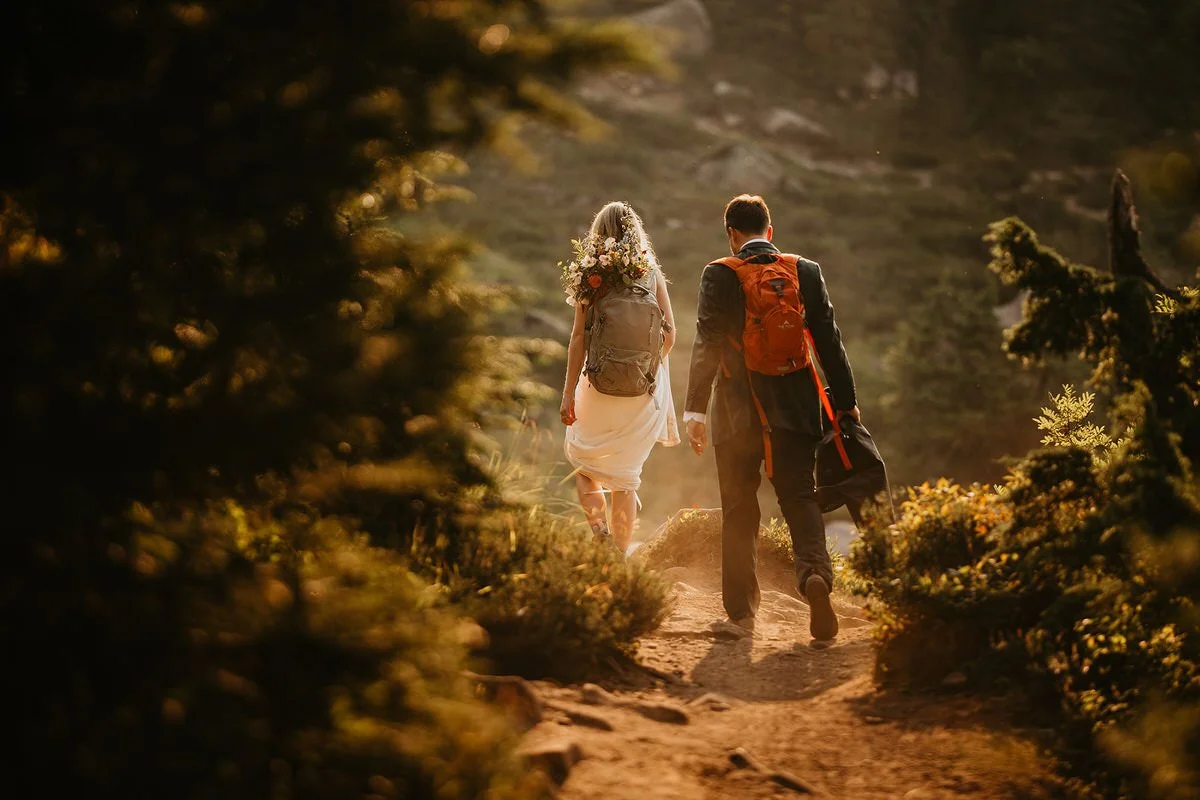
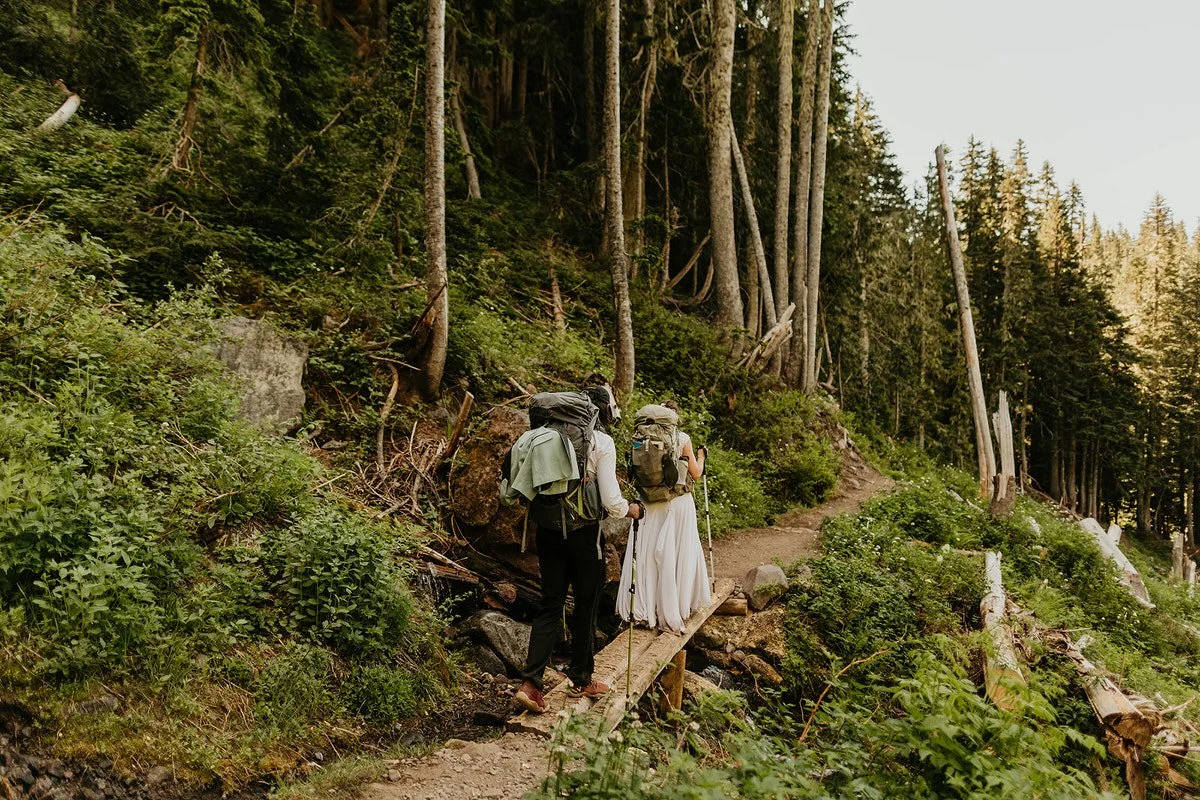
Step 5: What to Wear and How to Pack for a Hiking Elopement
You absolutely can hike in a wedding dress. You absolutely can hike in a suit. You just need to plan for it.
A hiking elopement outfit has to do two things well:
Look incredible in photos.
Function on real terrain.
You don’t have to sacrifice one for the other. You just have to think ahead.
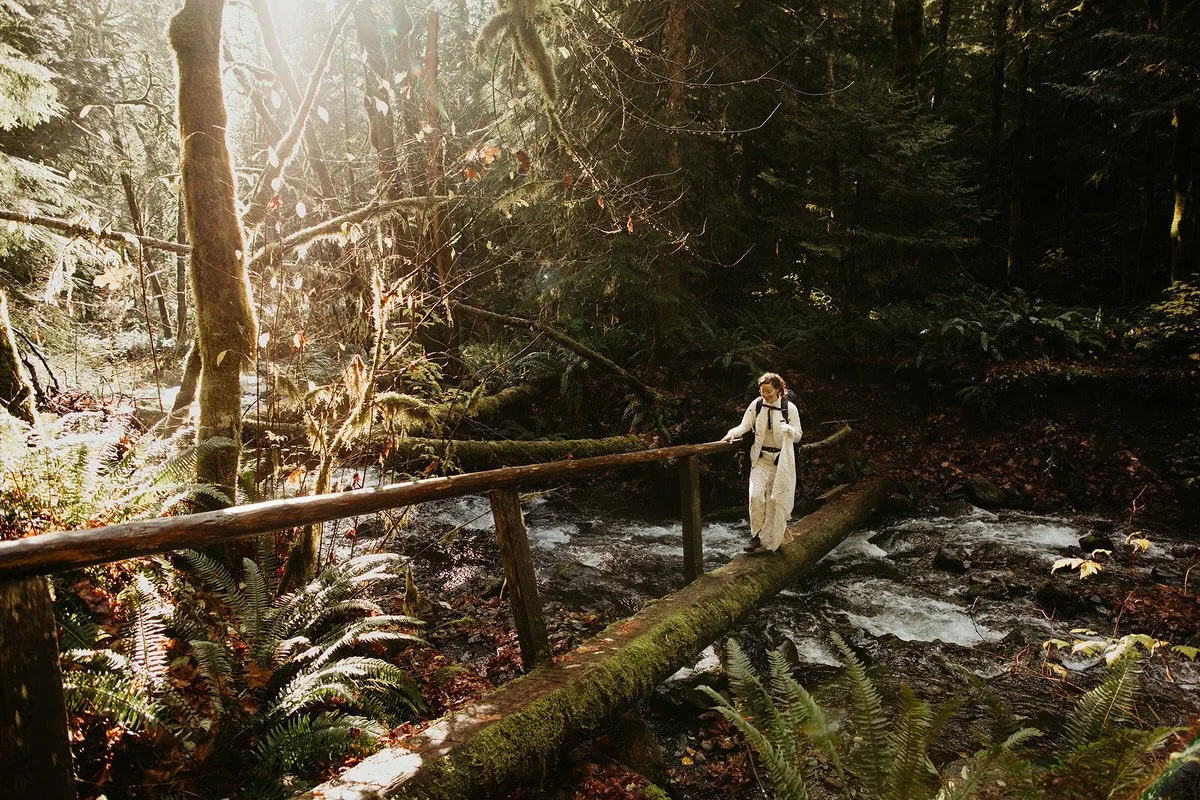
Should You Hike in Your Wedding Outfit?
There isn’t one right answer.
Some couples hike fully dressed from the trailhead. This works well for shorter, smoother trails and couples who don’t mind a little dirt on the hem.
Others:
Hike in activewear and change at the summit
Wear base layers under their outfit
Swap hiking boots for ceremony shoes at the top
Changing at your ceremony location can add a really intentional, intimate moment to the day. Just remember to build 15 to 30 minutes into your timeline if you plan to change.
If your dress has a long train or your suit is a lighter color, hiking in layers underneath can protect it on the way up.
There is no “correct” way. There is only what supports your experience best.
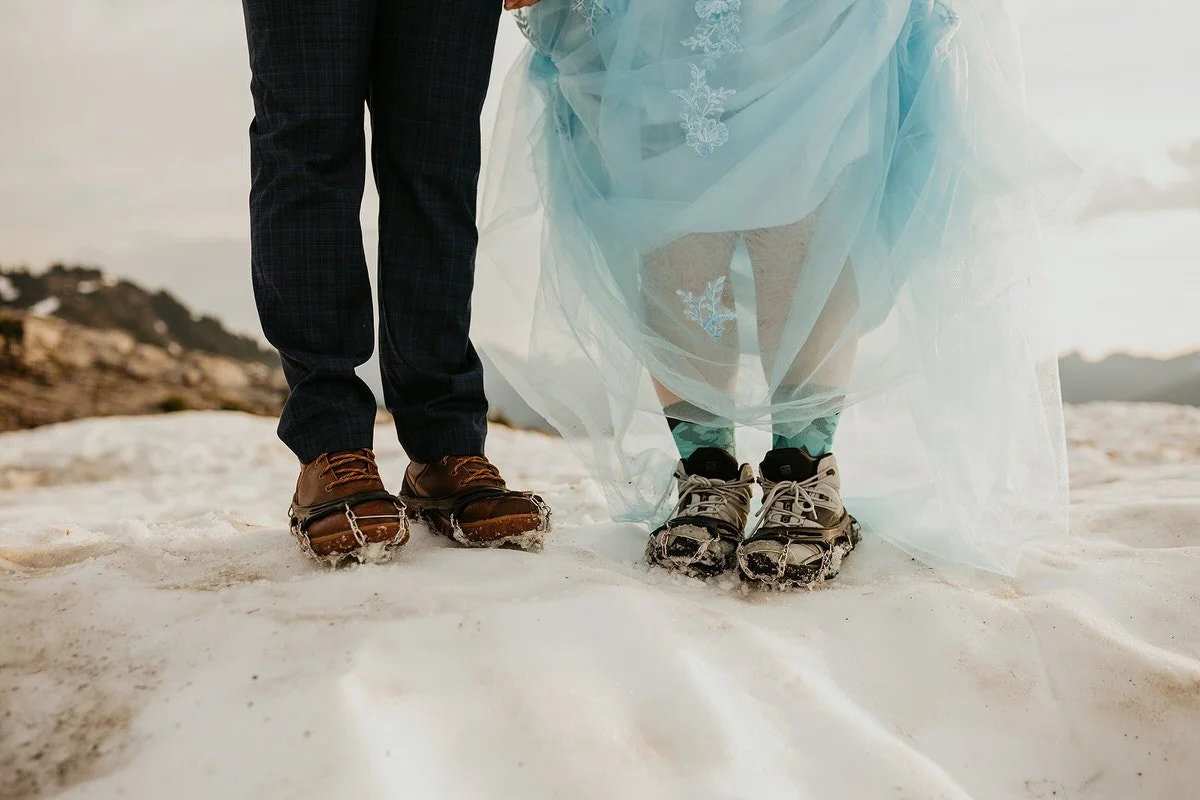
Footwear Matters More Than Anything
This is not the day to break in new boots.
Choose something:
Broken in
Supportive
Appropriate for the terrain
Comfortable for multiple hours
You can absolutely pack a second pair of shoes for photos if you want something fancier. Just do not sacrifice stability on steep or uneven sections for aesthetics.
Confident footing = relaxed energy.

How to Pack a Dress or Suit
If you’re hiking in casual clothes and changing at the top:
Use a breathable garment bag folded carefully into a backpack
Roll lightweight fabrics instead of folding to reduce creasing
Keep boutonnières or bouquets secured upright inside your pack
Pack a small towel or blanket to stand on while changing
Planning for the small realities of simply being outdoors prevents stress later.
Essential Hiking Elopement Packing List
Beyond your standard hiking essentials like water and snacks, consider:
Extra layers, even in summer
A headlamp for sunrise or post-sunset hiking
A small first-aid kit
Sunscreen and bug spray
A compact emergency blanket
Printed permits, just in case
Vow books secured in a waterproof pouch
Want specific recommendations for what to pack? I’ve got a list for you here.
Mountain weather shifts quickly. Temperatures drop fast after sunset. Being slightly overprepared feels way better than being cold and uncomfortable in wedding attire.
Protecting the Landscape While You Pack
Avoid large décor items that need to be carried in and out. Skip arches, confetti, artificial florals, or anything that could leave debris behind.
The most beautiful hiking elopements feel effortless because they work with the landscape, not against it.
When your packing plan is thoughtful, your day feels lighter. You move more freely. And you get to actually enjoy being up there.
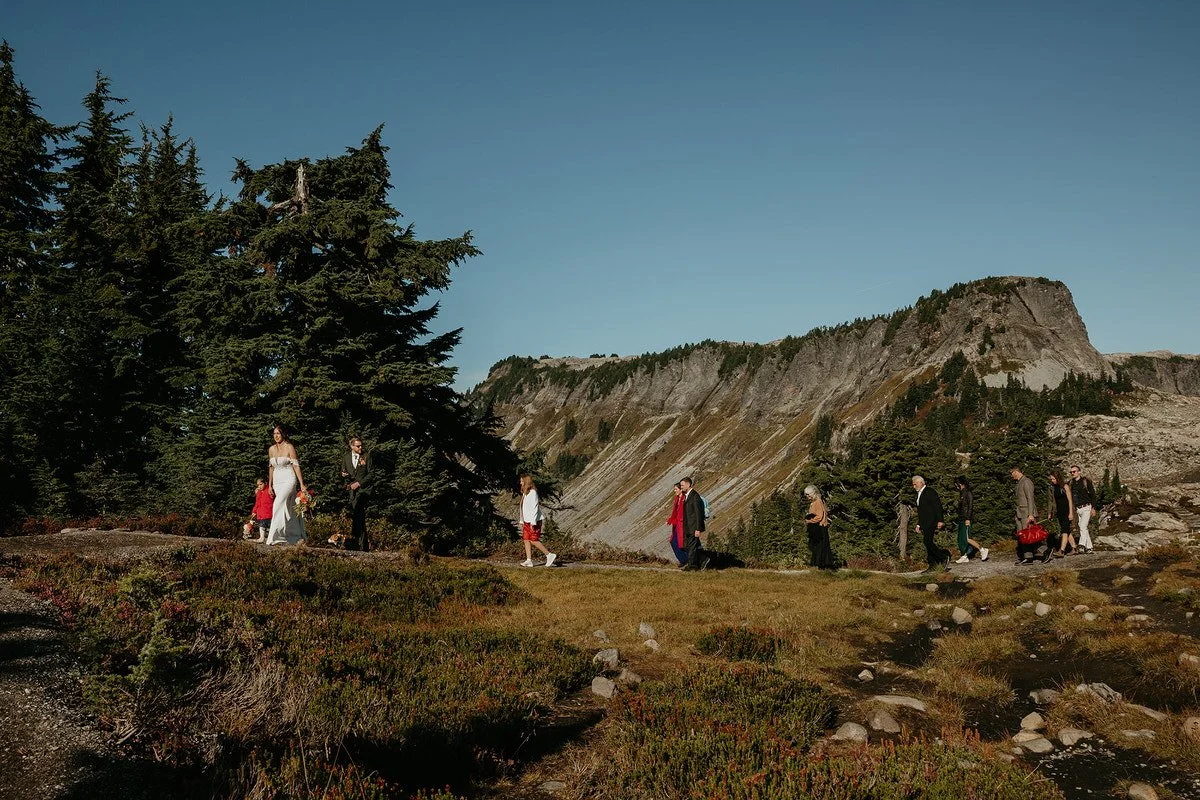
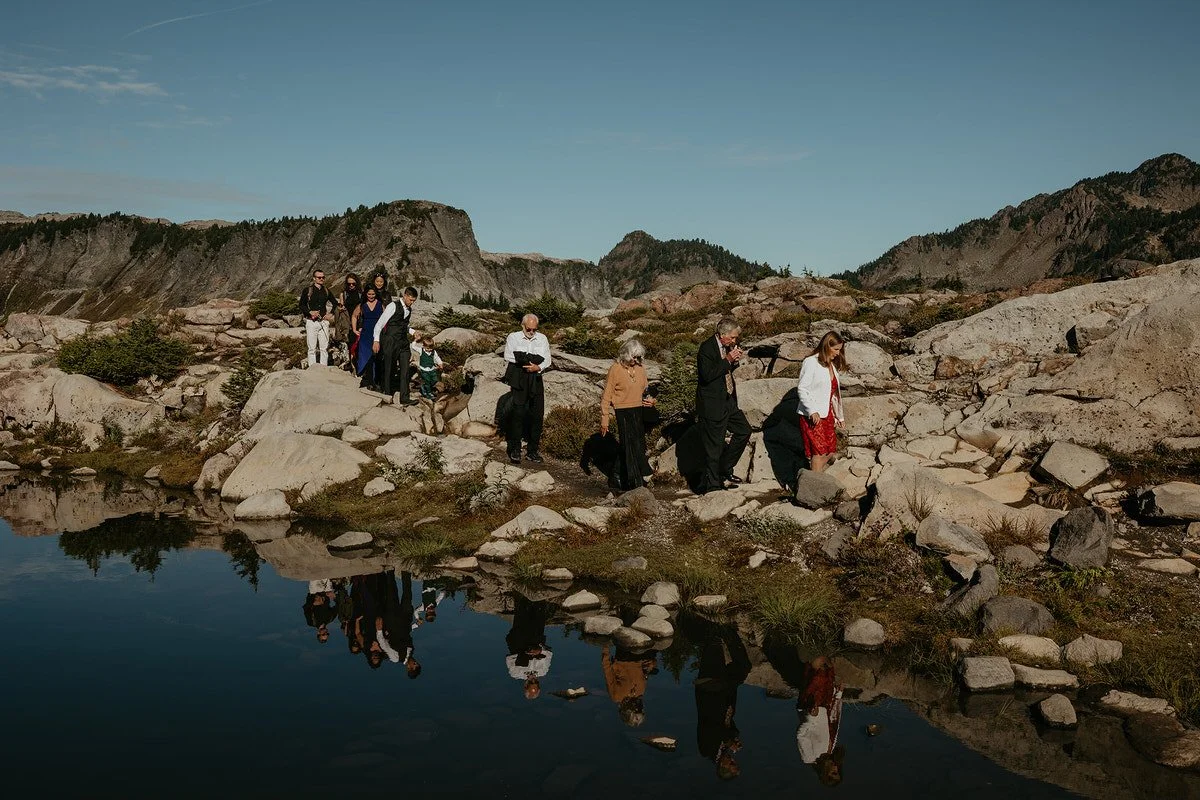
Step 6: Including Guests in a Hiking Elopement
Yes, you can have guests at a hiking elopement!
No, it does not have to be all or nothing.
The key is alignment.
A hiking elopement with guests works beautifully when expectations are clear and the trail matches everyone’s abilities. It becomes stressful when couples design a hike around their dream view without considering who’s coming along.
Start with one honest question:
Are we designing this experience primarily for us, or primarily for our guests?
There isn’t a wrong answer. But clarity here changes everything.
Choose a Trail That Matches Your Guest List
If guests are hiking with you, the trail should support them (read Hiking Etiquette 101 here).
Consider:
Distance and elevation gain
Uneven terrain or loose rock
Narrow or exposed sections
Bathroom access
Parking availability
A trail that feels moderate to you may feel intense to someone who doesn’t hike regularly.
When in doubt, choose slightly easier than you think you need. Your wedding day is not the time to test someone’s endurance.
Communicate Expectations Clearly
The most successful hiking elopements with guests are the ones where no one is surprised.
Be clear about:
Exact mileage and elevation gain
Weather exposure
Required footwear
Meeting time and hiking pace (add some buffer time here for parking, putting on hiking boots, packing up backpacks, etc.)
What to bring
Send trail details ahead of time. Share a packing list. Encourage honest feedback if someone is unsure about their ability to participate.
Clarity reduces stress for everyone.
Consider a Split-Day Format
You do not have to choose between “just us” and “everyone hikes.”
Many couples:
Hike privately for vows at sunrise
Meet guests at a, easy-to-access scenic overlook later
Celebrate with dinner at a cabin afterward
This format gives you both intimacy and inclusion.
It also protects elderly family members or guests with mobility limitations from feeling pressured.
Plan for Comfort and Safety
Build buffer time into your timeline so no one feels rushed.
Have water available.
Choose trails with safe turn-around points.
Be mindful of weather shifts.
If someone decides not to hike, that is not a failure. It simply means your day was designed intentionally.
How Many Guests Is Too Many for a Hiking Elopement?
There isn’t a universal number. But there is a tipping point.
In most hiking elopements, once you get above 10 to 15 guests, logistics shift quickly.
Here’s why:
Trails feel crowded faster
Hiking pace slows down
Privacy decreases
Parking becomes complicated
Permit restrictions tighten
On narrow ridgelines or alpine trails, even 12 people can feel like a large group.
And this part matters: permits often limit group size on public land. A “small” hiking elopement with 20 guests may not be allowed in certain areas at all. Capacity rules vary by park, forest, and trail, so confirm limits before finalizing your invite list.
If you’re envisioning:
A longer hike
Remote terrain
Sunrise privacy
Flexible, unstructured time
You’ll likely feel most relaxed keeping your guest list under 10.
If you’re inviting 15 to 25 people, consider choosing a shorter, more accessible trail or splitting the day into a private hike and a group ceremony.
The more guests you add, the more your hiking elopement starts to resemble a small outdoor wedding. That isn’t wrong. It just requires a different structure.
When the trail supports the group, the day feels meaningful and grounded.
When it doesn’t, it feels tense.
Design around the people you’re inviting, and the experience will follow.
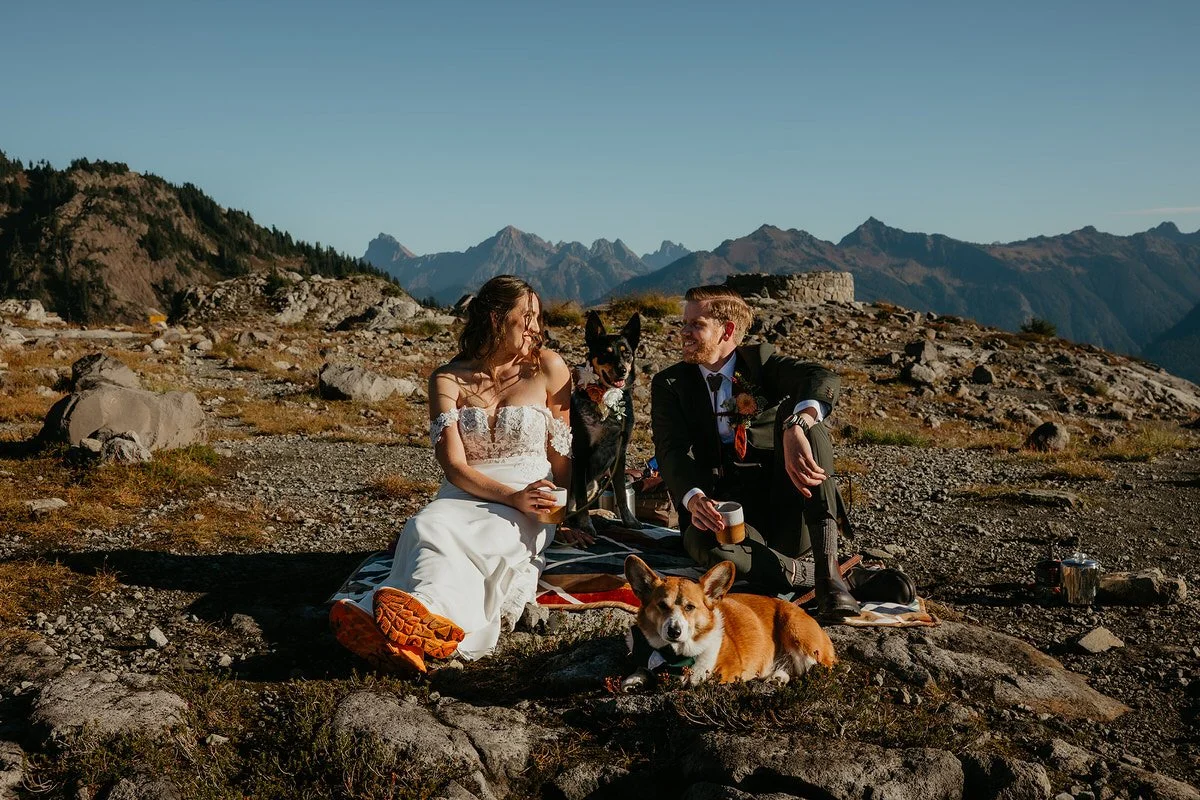
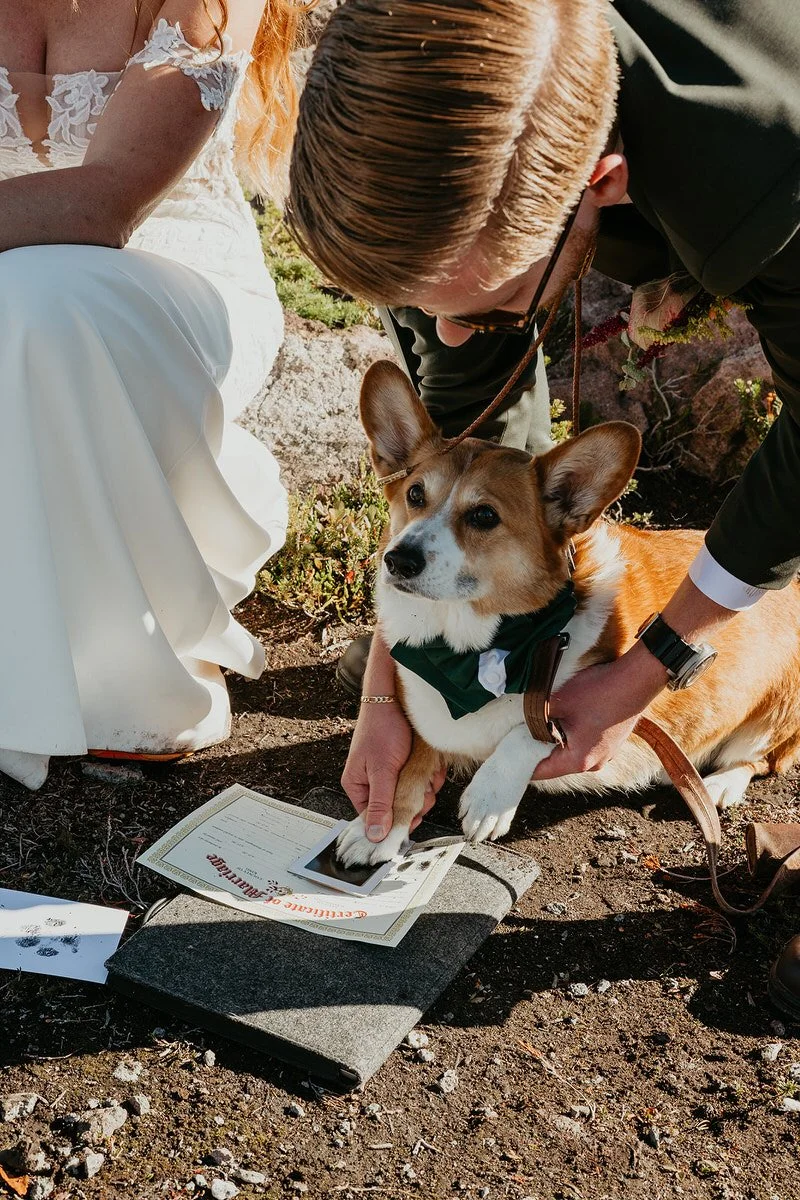
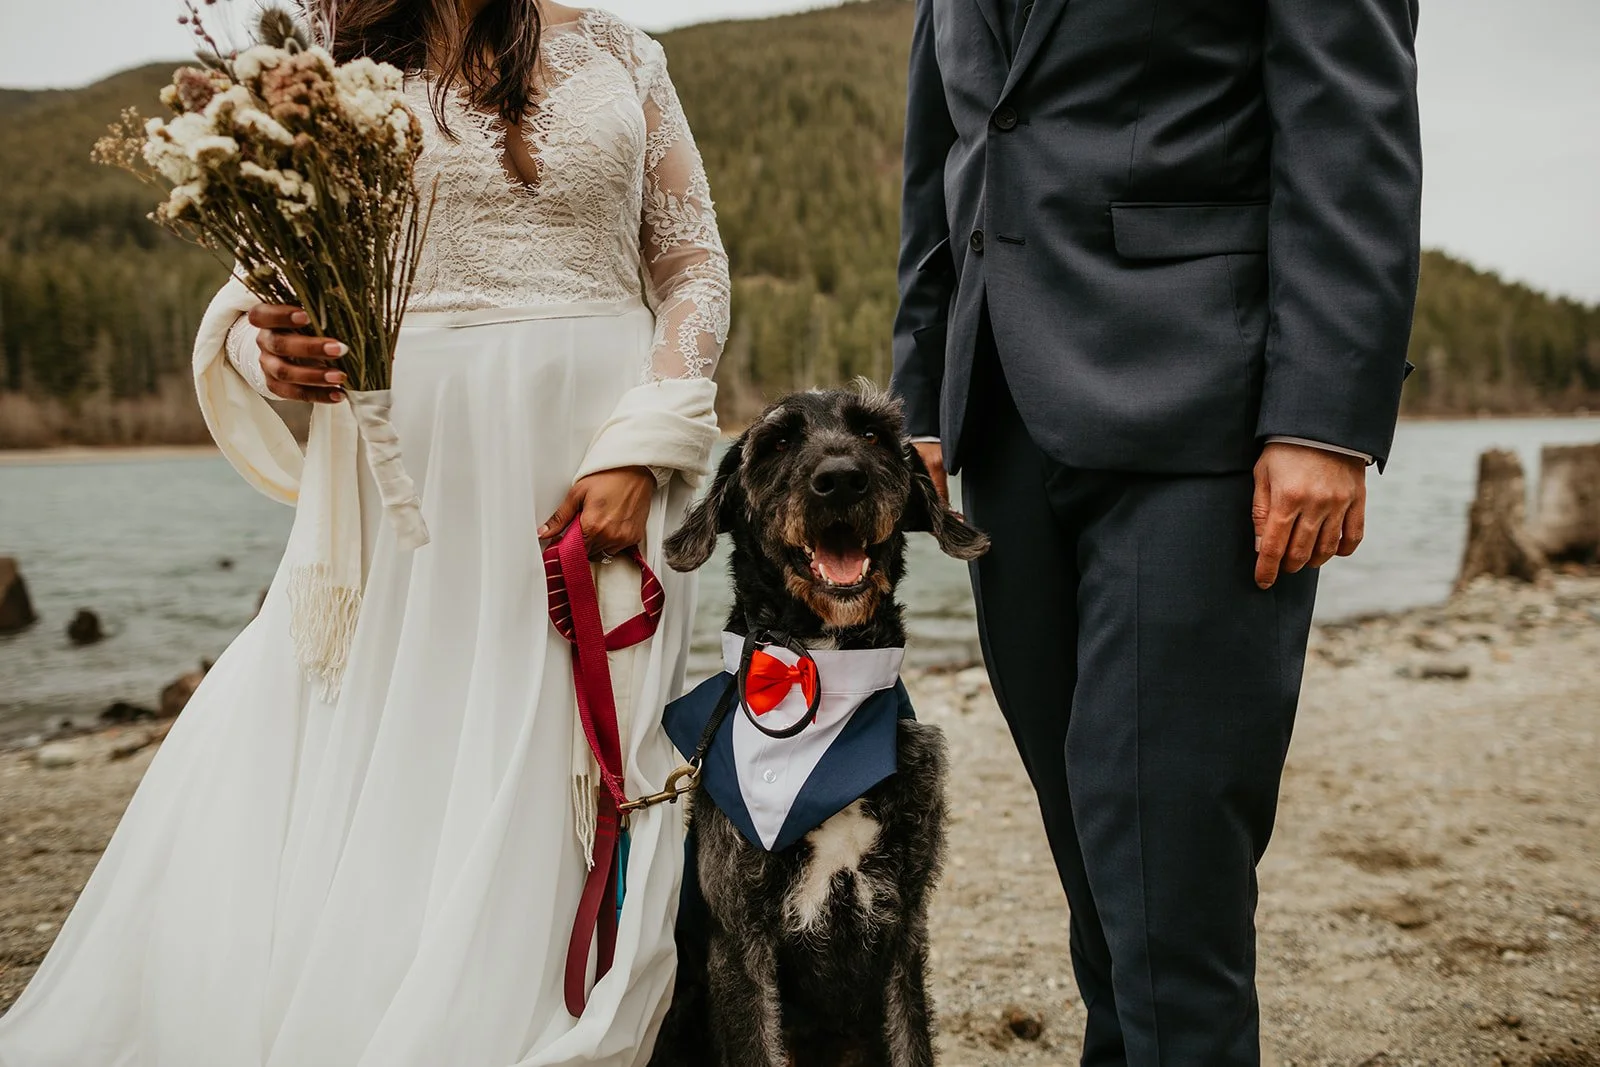
Step 7: Can You Bring Your Dog to a Hiking Elopement?
Okay. I know. Of course you want your dog there. I’ve actually got an entire blog post about how to include your dog the right way!
They hike with you. They’re in half your camera roll. They’re family. It makes sense that you’d picture them trotting down the trail beside you on your wedding day.
And sometimes? It works beautifully.
But this is where we pause and get intentional.
Because “I saw it on Instagram” is not the same thing as “this is allowed and a good idea.”
First: Are Dogs Even Allowed There?
This is non-negotiable.
Some trails allow dogs on leash.
Some only allow them in parking areas.
Some prohibit them completely.
National Parks in particular are often very strict. National Forest land is usually more flexible. State Parks are a mixed bag.
Do not build your entire vision around your dog being at the summit before confirming the actual rules.
If dogs aren’t allowed, that’s not a personal attack. It just means we pivot!
Second: Is This Actually Fun for Your Dog?
Your wedding day is not a normal hike.
There’s extra energy. Extra gear. Maybe guests. Maybe strangers congratulating you. Maybe wind. Maybe wildlife.
Be honest.
Does your dog:
Stay calm around crowds?
Walk well on leash?
Handle new environments confidently?
Hike the distance you’re planning regularly?
If yes? Amazing. We love that for you.
If your dog gets anxious, reactive, or overwhelmed easily? That matters. This day should feel joyful for them too, not stressful.
Sometimes the most loving decision is letting them stay home in their comfy bed.
Third: Plan the Logistics Like Adults
If your dog is coming, we don’t just wing it.
Think through:
Who’s holding the leash during the ceremony
Where they’ll be during portraits
Water and snack breaks
Temperature and weather exposure
Who takes them home if needed
👉 Pro tip: Designating one of your guests or hiring a dog attendant (yes, that’s a thing!) alleviates so much of this stress.
Everyone wins!
Also: Trail Etiquette Still Applies
If your dog is coming, you’re responsible for:
Keeping them leashed where required
Packing out waste
Preventing them from trampling fragile areas
Respecting wildlife and other hikers
A hiking elopement should not leave a trace. Not from you. Not from your pup.
We love dogs. We also love protecting the places we get married in.
If It’s Not the Right Fit
Your elopement is not less meaningful if your dog doesn’t make it to the summit.
You can:
Include them in getting ready photos
Do a pre-elopement hike with them
Celebrate with them the next day
Bring something small that represents them
Your dog doesn’t need a mountain backdrop to know they’re part of your life.
When bringing your dog is intentional, allowed, and aligned with their personality, it’s magic.
When it’s forced? It’s chaos.
We choose magic✨

Step 8: Leave No Trace and Trail Etiquette
If you’re choosing to get married on public land, you’re stepping into something bigger than just your wedding day.
These trails aren’t venues.
They’re shared, living landscapes.
And hiking elopements only work long term if couples treat these places with respect.
The goal is simple:
When you leave, it should look like you were never there.
What Leave No Trace Actually Means for Elopements
Leave No Trace is not just “don’t litter.”
It means:
Staying on established trails
Avoiding trampling wildflowers or fragile meadows
Not moving rocks or logs for photos
Packing out everything you bring in
Keeping group sizes within permit limits
Those “step off trail for just one photo” moments are what slowly damage sensitive ecosystems.
Alpine areas in particular take years to recover from a single footprint.
If the view requires stepping off trail into a protected meadow, it’s not your ceremony spot.
There is always another angle.
Decor, Arches, and Installations
This is where a lot of couples get tripped up.
Some public lands fully prohibit:
Arches
Chairs
Confetti
Artificial florals
Large décor pieces
Even biodegradable items can leave impact.
But some public lands allow some of these things, within reason! A few chairs for your older guests typically can be arranged. An easy to set up and tear down arch might be doable. It all depends on the specific public land.
👉 Bottom line: check your permit conditions, and plan for minimal impact.
Drones and Sound
Drones are banned in most National Parks and restricted in many other public lands.
Even where they are allowed, they can disturb wildlife and other hikers.
Music is another one. A small portable speaker might feel harmless, but blasting a processional song on a narrow trail affects everyone around you.
If privacy is important, choose a location and timing that supports it instead of trying to control the environment.
Sharing the Trail
You will not have the mountain to yourselves 100 percent of the time.
And that’s okay!
If hikers pass during your ceremony:
Smile. Pause. Let them through.
Most people are kind and respectful when they realize what’s happening (even excited and will do that quick little jog to get out of the way 😂).
Hiking elopements work best when you remember you’re guests out there too.
Why This Matters
Public lands are already seeing increased restrictions because of overcrowding and misuse.
When couples cut corners, leave items behind, or ignore rules, it affects everyone who comes after them.
Your hiking elopement should protect the land as much as it celebrates it.
That’s part of the adventure.
Bonus: Make It More Than Just a Hike
One of the best parts of a hiking elopement?
You are not locked into a six-hour ballroom rental.
You can build a full experience around it.
Your ceremony can be one moment in a bigger, intentional day.
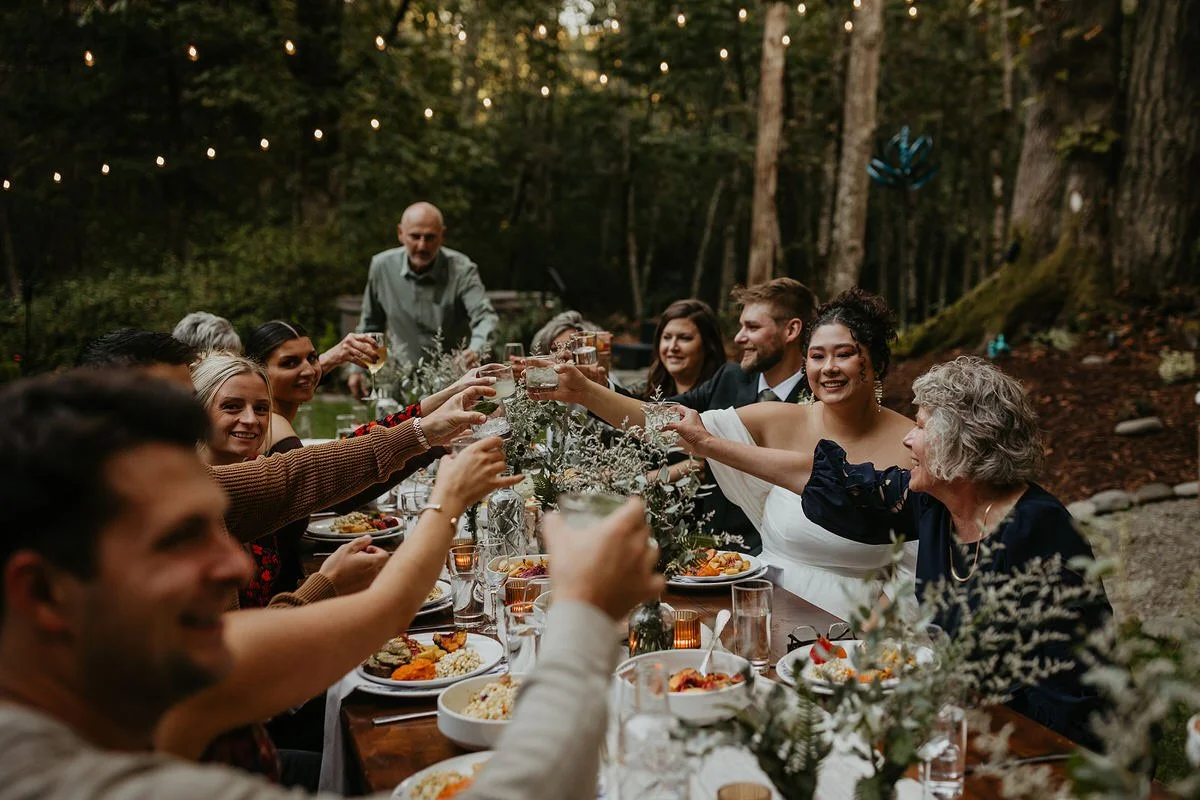
Add a Post-Hike Celebration
You don’t have to summit, say vows, and immediately drive home.
Consider:
A picnic at the trailhead (dressing up a picnic table is easier than you might think!)
Champagne and cake in the back of your car
A cabin dinner with a private chef
A reservation at your favorite restaurant
A campfire evening with your closest people
Adventure doesn’t cancel celebration. It just changes the setting.
Plan a Multi-Day Hiking Elopement
If you love hiking, why squeeze everything into one window?
Some couples:
Hike privately at sunrise one day
Share a ceremony with guests the next
Stay in a cozy cabin all weekend
Explore multiple landscapes across two days
This gives you space.
You don’t feel rushed. You don’t feel like you’re cramming portraits into one lighting window. You actually get to enjoy the place you chose.
Multi-day hiking elopements are especially beautiful if you’re traveling to a National Park or planning something remote.
Build in Adventure Activities
Your elopement doesn’t have to stop at vows.
You could:
Kayak on a lake together
Paddleboard at sunset
Have a first dance on a dock
Take a slow morning hike the next day
Bring coffee to a second overlook
The point isn’t to add more for the sake of it.
It’s to ask:
If we’re already here… what would make this feel unforgettable?
Slow Down On Purpose
Here’s something couples don’t always realize.
You don’t need constant movement.
Some of the most meaningful hiking elopements include:
Sitting quietly after vows
Sharing snacks at the summit
Watching the sun fully set
Taking your time hiking down
You don’t need a packed timeline to make the day feel full.
You need space to breathe.
When you treat your hiking elopement as an experience instead of a quick ceremony slot, everything changes.
It stops feeling like “we ran up a mountain and got married.”
It starts feeling like: “We built a day that actually reflects who we are.”
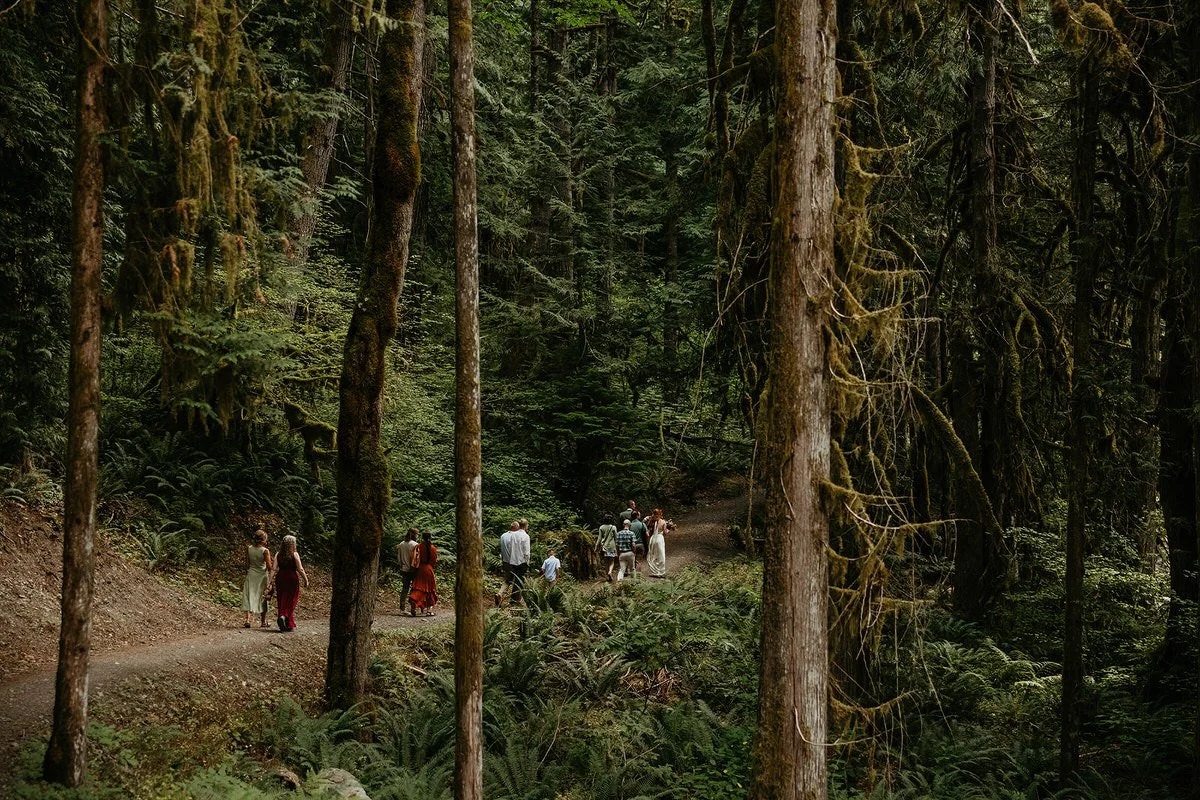
Great Areas for Hiking Elopements in Washington
If you’re narrowing down where to focus your search, here are a few regions that consistently work beautifully for hiking elopements.
North Cascades
Dramatic alpine ridgelines
Big, sweeping mountain views
Incredible summer wildflowers
Trails that feel remote and expansive
Perfect for couples who want that rugged, high-alpine energy.
You can read my full North Cascades elopement guide here →
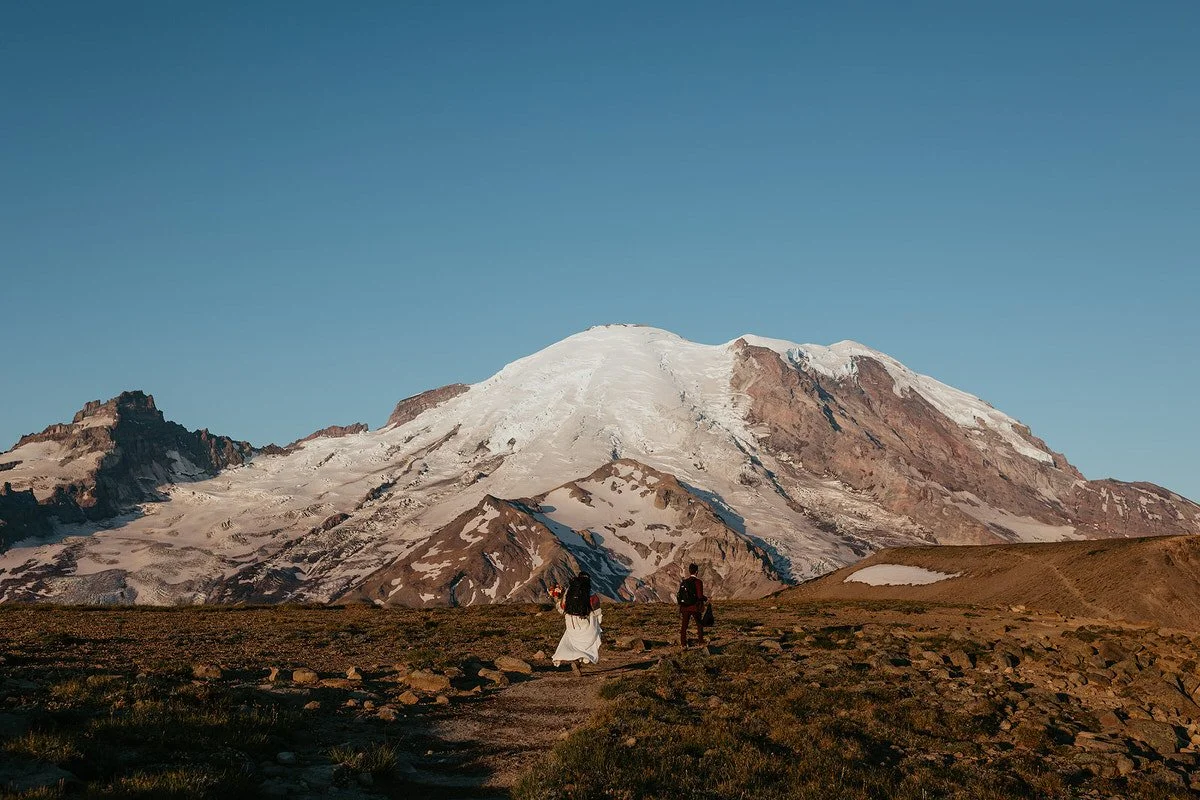
Mount Rainier National Park
Iconic Washington mountain backdrop
Subalpine meadows and late-summer blooms
A mix of shorter and moderate hiking options
Instantly recognizable scenery
Great if you want that classic Pacific Northwest summit view.
If Rainier is on your radar, start here →
Olympic National Park
Coastal cliffs and moody beaches
Lush mossy forests
Waterfalls and diverse ecosystems
Variety within one park
Ideal for couples who love texture, atmosphere, and landscape variety.
Full Olympic planning guide →
National Forest Land
More flexibility in trail selection
Fewer designated ceremony zones
A wide range of hike lengths and difficulty
Greater opportunity for privacy
Amazing for couples who want something a little less structured and more off-the-beaten-path.
The “best” area depends on your season, comfort level, and the kind of energy you want your day to have.
Once you narrow down the region, then you can get specific about trails.
Final Thoughts: Plan It Well, Then Enjoy It
A hiking elopement isn’t about choosing the hardest trail or the most dramatic summit.
It’s about building a day that feels aligned.
When you:
Choose a hike that matches your energy
Handle permits early
Build a timeline around light and pace
Pack intentionally
Respect the land
Everything feels steadier.
You’re not rushing. You’re not proving anything. You’re just present.
Plan it well. Then let yourself enjoy it.
And if you want someone who knows the trails, the seasons, and the fine print?
Hiking Elopement FAQs
Do you need a permit for a hiking elopement?
Often, yes. Many National Parks, State Parks, and some National Forest districts require a special use permit for ceremonies, even small ones. Requirements vary by land manager, so always confirm rules before finalizing your location.
What should you wear for a hiking elopement?
You can hike in your wedding attire or change at your ceremony location. Footwear is the most important decision. Choose broken-in, supportive shoes appropriate for the terrain. Layers are essential, especially in mountain environments where temperatures shift quickly.
Can you hike in a wedding dress?
Yes, you absolutely can hike in a wedding dress. Many couples either hike fully dressed or change at their ceremony location. Lightweight fabrics, shorter trains, and layering underneath can make it much more comfortable. Always choose supportive footwear for the terrain.
How far should you hike for an elopement?
Most hiking elopements involve anywhere from 1 to 5 miles round trip. Elevation gain matters more than distance. A 2-mile trail with steep climbing can feel harder than a gradual 4-mile hike. Choose a trail you can comfortably complete while carrying gear and managing wedding-day energy.
What is the best time of year for a hiking elopement?
Summer offers access to higher elevation trails with alpine views. Spring and fall provide fewer crowds and cooler temperatures. Winter elopements are possible but require additional preparation for snow, road closures, and shorter daylight hours.
Can you bring guests to a hiking elopement?
Yes, but the trail should match your guest list. Smaller groups, typically under 10 to 15 people, feel more manageable on hiking trails. Always check permit limits and consider accessibility, terrain, and pace when inviting guests.
Are dogs allowed at hiking elopements?
It depends on the location. Some trails allow leashed dogs, while others prohibit them entirely. National Parks often have stricter rules. Always confirm regulations before planning to include your dog.
How long does a hiking elopement take?
Most hiking elopements last between 4 and 8 hours, depending on trail distance, lighting goals, and added activities. Building buffer time into your timeline helps the day feel relaxed instead of rushed.
Do you need an officiant for a hiking elopement?
In most states, yes. If you want your marriage to be legally recognized, you typically need an officiant and witnesses. In Washington specifically, you must have two witnesses present during your ceremony and complete your marriage license within the required time frame. Always confirm legal requirements for the state you’re eloping in before finalizing your plans.
What if it rains on your hiking elopement?
Rain is always a possibility, especially in mountain and coastal regions. The key is planning for it instead of fearing it. Bring waterproof layers, protect your gear, and build flexibility into your timeline. With preparation, rain can feel romantic instead of stressful.
👉 I’ve got a full blog post about how to deal with ‘bad’ weather on your elopement day here!
Want help planning your hiking elopement?
If you’re dreaming about a trailhead start, quiet vows somewhere wild, and a day that feels intentional instead of overwhelming, I’d love to help you build it.
Hiking elopements come with real logistics. Permits. Timelines. Guest dynamics. Weather plans. Trail scouting. Backup options.
You don’t have to figure all of that out alone.
If you want someone who knows the trails, reads the fine print, and makes the whole thing feel calm instead of chaotic - let’s talk! 🫶🏻
How to Elope in Washington State
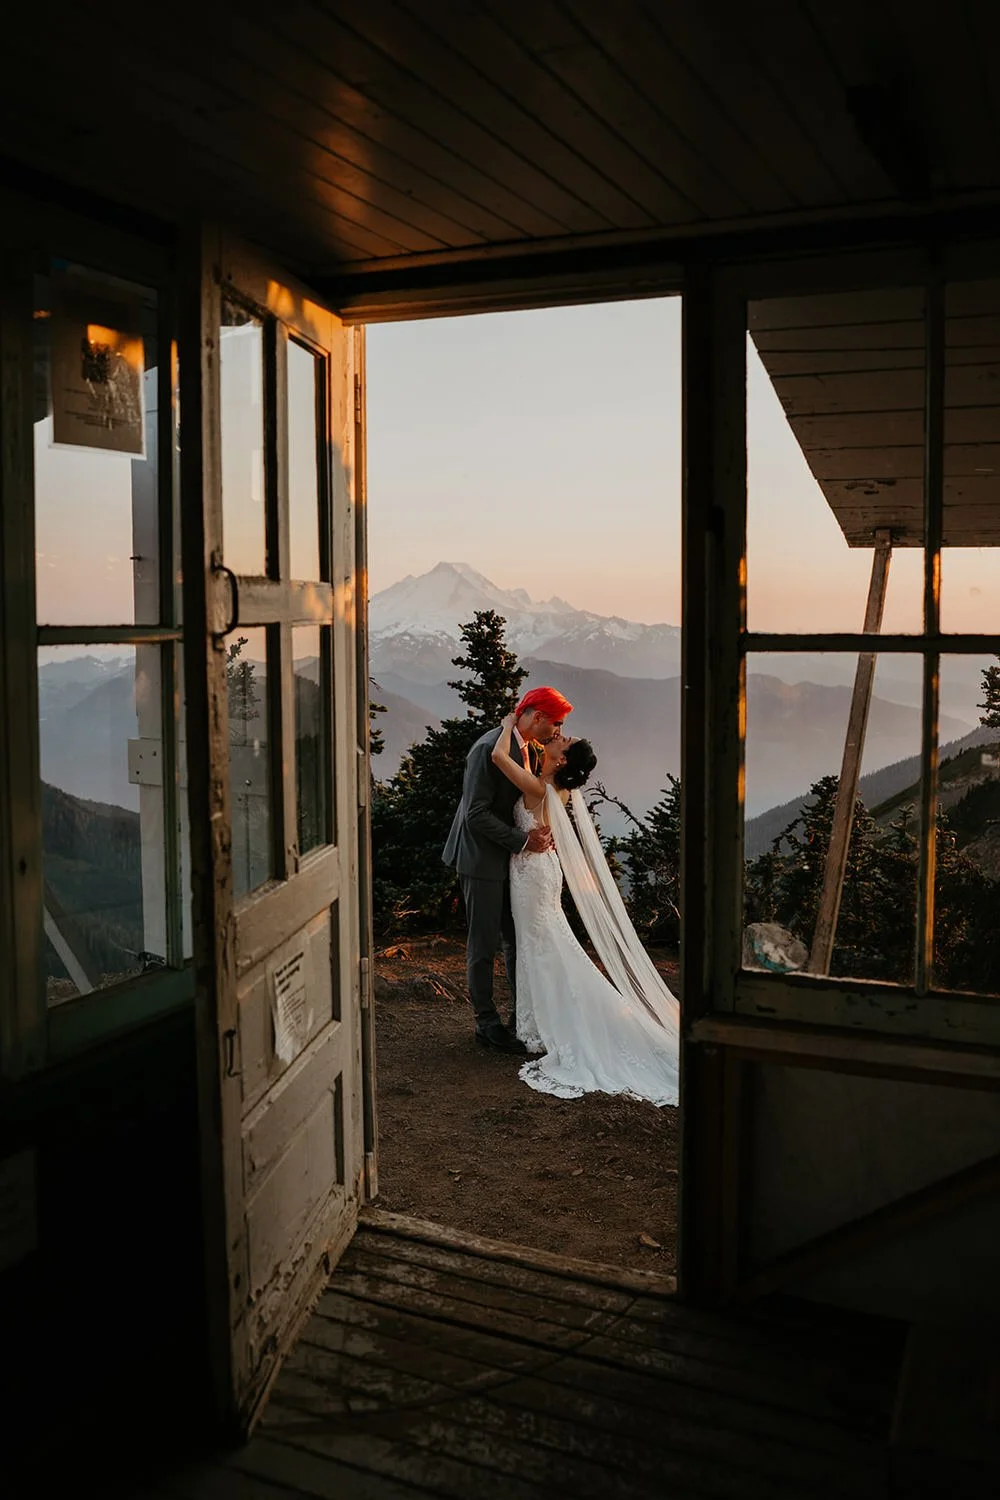
Eloping at a Washington Fire Lookout

Best Mountain Elopement Locations in WA
Van Gachnang is a Washington elopement photographer who specializes in hiking elopements across Mount Rainier, Olympic National Park, North Cascades, and wild places throughout the Pacific Northwest. She helps couples plan intentional, experience-driven elopements that prioritize adventure, privacy, and Leave No Trace principles.